Thursday, June 14, 2012

HOW TO CONFIGURE WINDOWS SERVER 2008 DHCP SERVER


Installing Windows Server 2008 DCHP Server is easy. DHCP Server is now a “role” of Windows Server 2008 – not a windows component as it was in the past.
To do this, you will need a Windows Server 2008 system already installed and configured with a static IP address. You will need to know your network’s IP address range, the range of IP addresses you will want to hand out to your PC clients, your DNS server IP addresses, and your default gateway. Additionally, you will want to have a plan for all subnets involved, what scopes you will want to define, and what exclusions you will want to create.
To start the DHCP installation process, you can click Add Roles from the Initial Configuration Tasks window or from Server Manager à Roles à Add Roles.

Figure 1: Adding a new Role in Windows Server 2008
When the Add Roles Wizard comes up, you can click Next on that screen.
Next, select that you want to add the DHCP Server Role, and click Next.

Figure 2: Selecting the DHCP Server Role
If you do not have a static IP address assigned on your server, you will get a warning that you should not install DHCP with a dynamic IP address.
At this point, you will begin being prompted for IP network information, scope information, and DNS information. If you only want to install DHCP server with no configured scopes or settings, you can just click Next through these questions and proceed with the installation.
On the other hand, you can optionally configure your DHCP Server during this part of the installation.
In my case, I chose to take this opportunity to configure some basic IP settings and configure my first DHCP Scope.
I was shown my network connection binding and asked to verify it, like this:

Figure 3: Network connection binding
What the wizard is asking is, “what interface do you want to provide DHCP services on?” I took the default and clickedNext.
Next, I entered my Parent Domain, Primary DNS Server, and Alternate DNS Server (as you see below) and clicked Next.

Figure 4: Entering domain and DNS information
I opted NOT to use WINS on my network and I clicked Next.
Then, I was promoted to configure a DHCP scope for the new DHCP Server. I have opted to configure an IP address range of 192.168.1.50-100 to cover the 25+ PC Clients on my local network. To do this, I clicked Add to add a new scope. As you see below, I named the Scope WBC-Local, configured the starting and ending IP addresses of 192.168.1.50-192.168.1.100, subnet mask of 255.255.255.0, default gateway of 192.168.1.1, type of subnet(wired), and activated the scope.

Figure 5: Adding a new DHCP Scope
Back in the Add Scope screen, I clicked Next to add the new scope (once the DHCP Server is installed).
I chose to Disable DHCPv6 stateless mode for this server and clicked Next.
Then, I confirmed my DHCP Installation Selections (on the screen below) and clicked Install.

Figure 6: Confirm Installation Selections
After only a few seconds, the DHCP Server was installed and I saw the window, below:

Figure 7: Windows Server 2008 DHCP Server Installation succeeded
I clicked Close to close the installer window, then moved on to how to manage my new DHCP Server.

How to Manage your new Windows Server 2008 DHCP Server

Like the installation, managing Windows Server 2008 DHCP Server is also easy. Back in my Windows Server 2008Server Manager, under Roles, I clicked on the new DHCP Server entry.

Figure 8: DHCP Server management in Server Manager
While I cannot manage the DHCP Server scopes and clients from here, what I can do is to manage what events, services, and resources are related to the DHCP Server installation. Thus, this is a good place to go to check the status of the DHCP Server and what events have happened around it.
However, to really configure the DHCP Server and see what clients have obtained IP addresses, I need to go to the DHCP Server MMC. To do this, I went to Start à Administrative Tools à DHCP Server, like this:

Figure 9: Starting the DHCP Server MMC
When expanded out, the MMC offers a lot of features. Here is what it looks like:

Figure 10: The Windows Server 2008 DHCP Server MMC
The DHCP Server MMC offers IPv4 & IPv6 DHCP Server info including all scopes, pools, leases, reservations, scope options, and server options.
If I go into the address pool and the scope options, I can see that the configuration we made when we installed the DHCP Server did, indeed, work. The scope IP address range is there, and so are the DNS Server & default gateway.

Figure 11: DHCP Server Address Pool

Figure 12: DHCP Server Scope Options
So how do we know that this really works if we do not test it? The answer is that we do not. Now, let’s test to make sure it works.

How do we test our Windows Server 2008 DHCP Server?

To test this, I have a Windows Vista PC Client on the same network segment as the Windows Server 2008 DHCP server. To be safe, I have no other devices on this network segment.
I did an IPCONFIG /RELEASE then an IPCONFIG /RENEW and verified that I received an IP address from the new DHCP server, as you can see below:

Figure 13: Vista client received IP address from new DHCP Server
Also, I went to my Windows 2008 Server and verified that the new Vista client was listed as a client on the DHCP server. This did indeed check out, as you can see below:

Figure 14: Win 2008 DHCP Server has the Vista client listed under Address Leases
With that, I knew that I had a working configuration and we are done!

Friday, January 6, 2012

Setting up your JIRA database for MS SQL Server 2005

Setting up your JIRA database for MS SQL Server 2005

Skip to end of metadata Go to start of metadata
On this page:

Overview


This page supplements the documentation for Connecting JIRA to SQL Server 2005. It provides detailed instructions on setting up your JIRA database for a straightforward integration of JIRA with SQL Server 2005. Unfortunately we do not provide support for advanced database configuration, such as hardening or performance tuning. If you require a more complex solution, refer to MS SQL 2005 Documentation and, if necessary, consult with someone in your organisation who is knowledgeable in the configuration of SQL Server 2005.

Before you start


1. Enable network connectivity for SQL Server

Ensure that your instance of SQL Server allows TCP/IP connection and is listing on the default port. Please note that network connectivity is disabled by default in some versions of SQL Server (e.g. SQL Server 2005 Express edition). Hence, you will have to enable it, as described below:
To enable TCP/IP for SQL Server,
  1. Open the 'SQL Server Configuration Manager'.
  2. Expand 'SQL Server 2005 Network Configuration' in the console pane.
  3. Click 'Protocols for <instance name>'.
  4. The details pane will display (see screenshot below). Right-click 'TCP/IP' and click 'Enable'.
  5. Click 'SQL Server 2005 Services' in the console pane.
  6. The details pane will display. Right-click 'SQL Server (<instance name>)' and click 'Restart' to stop and restart the SQL Server service.
Screenshot: Enabling TCP/IP for SQL Server 2005

2. Configure SQL Server with the appropriate Authentication Mode

Ensure that SQL Server is operating in the appropriate authentication mode. By default, SQL Server operates in 'Windows Authentication Mode'. However, if your user is not associated with a trusted SQL connection, i.e. 'Microsoft SQL Server, Error: 18452' is received during JIRA startup, you will need to change the authentication mode to 'Mixed Authentication Mode'.
Read the Microsoft documentation on authentication modes for instructions on changing the authentication mode.

3. Disable the 'SET NOCOUNT' option in SQL Server

To disable the 'SET NOCOUNT' option in SQL Server,
  1. Open the 'SQL Server Management Studio'
  2. Navigate to ''Tools' -> 'Options' -> 'Query Execution' -> 'SQL Server' -> 'Advanced'. The advanced settings for SQL Server will display.
  3. Ensure that the 'SET NOCOUNT' option is not selected, as per the screenshot below:
Screenshot: Disabling 'SET NOCOUNT' for SQL Server

Setting up the JIRA database


To set up your JIRA database for SQL Server 2005,

1. Create a new database

  1. Open the 'SQL Server Management Studio'.
  2. Connect to the SQL Server that you want to integrate JIRA with. By default this will be 'localhost'.
  3. Navigate to '<your server name>' -> 'Databases' in the left menu of the 'SQL Server Management Studio'.
  4. Right-click 'Databases' under the server name of your SQL Server and select the 'New Database...' option from the dropdown menu that appears.
  5. The 'New Database' window will display. Select the 'General' option in the left menu.
  6. The 'General' page will display (see screenshot below). Enter jiradb in the 'Database name' field.
  7. Select the 'Options' option in the left menu. Check the collation type, the collation type has to be case insensitive e.g.: 'SQL_Latin1_General_CP437_CI_AI' is case insensitive. If it is using your server default, check the collation type of your server.
    Screenshot: Create jiradb database
  8. Click the 'OK' button to create the database.

2. Create a new database user

  1. Navigate to '<your server name>' -> 'Security' -> 'Logins' in the left menu of the 'SQL Server Management Studio'.
  2. _Right-click the 'Logins' folder and select 'New Login'.
  3. The 'Login - New' window will display. Select the 'General' option in the left menu.
  4. Enter the database user details into the window that displays (see screenshot below), as follows:
    1. Enter 'jirauser' in the 'Login name' field.
    2. Select 'SQL Server authentication'.
    3. Enter 'jirauser' as the password, and enter 'jirauser' again in the 'Confirm password' field.
    4. If you wish to enforce a password policy, check the 'Enforce password policy' checkbox. However, please be aware that you may need to modify the previously entered password ('jirauser') to meet your password policy rules (e.g. your password policy may require numeric characters in all passwords).
    5. Ensure that the 'Enforce password expiration' checkbox is unchecked. It will be automatically unchecked and disabled, if you have previously unchecked the 'Enforce password policy' checkbox.
    6. Ensure that the 'User must change password at next login' checkbox is unchecked. It will be automatically unchecked and disabled, if you have previously unchecked the 'Enforce password policy' checkbox.
      Screenshot: Create jirauser user
  5. Select the 'User Mapping' option in the left menu.
  6. The User Mapping fields for jiradb will display (see screenshot below). Tick the 'jiradb' checkbox.
  7. The 'Database role membership for:jiradb' panel will display in the bottom panel of the window. Tick the 'db_owner' checkbox.
  8. Click the 'OK' button to save your changes.
    Screenshot: Create user mapping for jirauser

3. Create a JIRA database schema

  1. Navigate to '<your server name>' -> 'Databases' -> 'jiradb' -> 'Security' -> 'Schemas' in the left menu of the 'SQL Server Management Studio'.
  2. Right-click the 'Schemas' folder and select 'New Schema'
  3. The 'Schema - New' window will display. Select the 'General' option in the left menu.
  4. The 'General' page will display (see screenshot below). Fill in the fields, as follows:
    • Enter jiraschema in the 'Schema name' field.
    • Enter jirauser in the 'Schema owner' field.
      Screenshot: Create JIRA database schema
  5. Select the 'Permissions' option in the left menu.
  6. The 'Permissions' page will display (see screenshot below). Click the 'Add...' button.
  7. Enter 'jirauser' in the 'Enter the object names to select (examples):' field on the pop-up window that displays. Click 'OK' to save your update and close the pop-up window.
  8. Specify the schema permissions in the 'Explicit permission for jirauser' table on the 'Permissions' page, as follows:
    • Alter — check the 'Grant' checkbox.
    • Delete — check the 'Grant' checkbox.
    • Insert — check the 'Grant' checkbox.
    • References — check the 'Grant' checkbox.
    • Select — check the 'Grant' checkbox.
    • Update — check the 'Grant' checkbox.
  9. Click the 'OK' button to save your changes.
    Screenshot: Create Permissions for JIRA Schema

Congratulations, you have set up a JIRA database for SQL Server 2005. Please refer back to the Connecting JIRA to SQL Server 2005 page to continue integrating SQL Server 2005 with JIRA.

Tuesday, December 27, 2011

SQL server 2005 log Mirroring Database Step-by-Step

Introduction

In this article, I'm going to cover:
  • Setting up the ASPState database in a mirrored environment
  • Configuring an ASP.NET web-application to use the mirrored ASPState database
  • How to do a manual failover (for maintenance scenarios)
  • How to do a forced failover (when the database server unexpectedly goes boom)

Background

It's fairly common for businesses to want to provide some high availability for their SQL Server databases, and one option is to have two SQL Server databases on separate machines with a SQL Server database mirrored. Microsoft provides mirroring out of the box in SQL Server 2005 and SQL Server 2008, and is a much cheaper alternative than going down the clustering/failover route, but does provide some protection. In mirroring, there is always one Principal database which serves the requests, and a standby Mirror that is always synchronizing. If the Principal database goes down, then the Mirror can be forced to become the Principal, and will then serve the requests. Once the original Principal is available again, it will become the new Mirror.
Setting up a mirrored database is not straightforward as it should be. Although there is a wizard, there are a number of steps that must be performed before a database can be mirrored, and also a number of "gotchas" which prevent it from working. This I found, to my own pain and frustration, over a number of days. Although Microsoft provides a large amount of documentation on the subject, a lot of it may not be relevant, and it's not easy to work out exactly what needs to be done. I needed a step-by-step guide to setting up a basic mirrored database, and couldn't find one, so here's my attempt at providing this to help other people in the future.
I'm going to use the ASP Session database as the example, since this is a common requirement, but this guide is good for any database you may have. I've used the same steps for other company databases. This is also good for SQL Server 2005, although I performed these steps on a SQL Server 2008 Standard Edition.
As soon as a mirrored database server is introduced, the ASP State can no longer use the State Server or the In-Memory Model, but must be configured to use the ASPState SQL Server state database. Since this database is mirrored, the user can move from one web server to another during a session, and the session state will be maintained between the servers.

Step 1- Installing the ASP Session Database

This step is omitted for a normal database.
First things first, we need to install the ASPState database on the Principal server.
Navigate to the C:\Windows\Microsoft.NET\Framework\v2.0.50727 folder and type the following command:
aspnet_regsql.exe -ssadd -sstype:p -S [myserver] -U [mylogin] -P [mypassword]
The parameters are case sensitive. This will create the ASPState database on the specified server. You could use the parameter -E instead of the -U and -P parameters to use the current credentials.
If the -sstype:p parameter is not specified, then by default, the ASP.NET sessions will be put into the TempDB database and not the ASPState database. This confused me for a while. This is fine for a normal non-mirrored environment because the ASP sessions will be cleared if the server is restarted. But, this is not fine for the mirrored environment, because we want to mirror the ASP session data itself, not just the Stored Procedures! Also, mirroring is not possible on the TempDB database. The -sstype:p parameter makes ASP.NET install the session tables into the ASPState database, and they'll be persisted if the server is restarted. This is exactly the behaviour we want for a mirrored environment.
mirror_1.jpg

Step 2 - Installing the Database on the Mirrored Server

Start at this step for a normal database.
In order to get the database onto the mirrored server, we do a full backup of the ASPState (or the database you are mirroring) on the Principal server, followed by a backup of the Transaction Log.
  • Perform a full backup of the database on the Principal server.
  • Perform a Transaction Log backup on the Principal server.
  • Copy the backup file to the Mirror.
  • Important: Do a restore of the full backup into a new step, but before doing the restore, go to Options, then ensure you check the No Recovery option! This is vital!
  • Perform another restore of the Transaction Log, also with the No Recovery option. (This is important, otherwise you'll get an error when starting the mirror - See Gotchas section for explanation).
mirror_3.jpg
You'll notice that the database on the Mirror server now is marked as "Restoring..." and can't be accessed. This is normal and expected! This confused me for quite some time, thinking that it was incorrect.
mirror_4.jpg The Mirror is always in a permanent Restoring state to prevent users accessing the database, but will be receiving synchronization data. If the database fails over to the Mirror, then it will become an active database and the old Principal will go into the Recovering state.

Step 3 - Setting the SQL Server Service Impersonation

By default, and in most installations, the SQL Server Service in the Services applet runs as the Local System account. However, for mirroring to work, this needs to be changed to a local user. The Local System account does not have access to the network resources, so is unable to communicate with the mirrored server through the endpoint. It's vital that this step is completed, since I spent many an hour wondering why the mirroring wasn't working.
  • Create a local user on both the Principal and the Mirror server with the same username and password. For example, "sqluser".
  • Edit the SQL Server Service and change the Logon to this user.
  • Do the same for the SQL Server Agent service.
  • Change the SQL Server Agent service to be Automatic.
  • Re-start the SQL Server Service and then the SQL Agent service.
  • Do this on both the Principal and the Mirror!
It's important that the SQL Agent is also running. Because:
  1. it runs automated backup jobs and
  2. it expires the sessions in ASP
If you find that ASP.NET sessions are not being expired in the ASPState database, then it's because the SQL Agent service is not running.
Sometimes, you may find that the SQL Agent does not start. This can be resolved by re-starting the SQL Server Service and then the SQL Agent again.
Create a SQL Login on both SQL Servers for this user you created.
mirror_2b.jpg

Step 4 - Setting Up the Mirror

Now, it's time to actually setup the mirror! Go to the Database Properties on the ASPState database (or your database), and choose the Mirroring tab.
If the Mirror tab does not appear in SQL Server 2008, then re-run the setup and ensure you've ticked the Complete SQL Tools options.
mirror_5a2.jpg
  • Click "Configure Security"
  • Click Next on the wizard
  • Choose whether you want a Witness server or not, (this article does not cover Witness servers) and click Next
  • In the Principal Server Instance stage, leave everything as its default (you can't change anything anyway)
mirror_5b.jpg
In the Mirror Server Instance stage, choose your Mirror server from the dropdown and click Connect to provide the credentials. Click Next.
mirror_5c.jpg
  • In the next dialog about Service Accounts, leave these blank (you only need to fill them in if the servers are in a domain or in trusted domains)
  • Click Next and Finish
  • Click "Do not start mirroring"
  • Enter in the FQDN of the servers if you want, but this is not necessary (as long as it will resolve)
  • Click Start Mirroring (if you do not have a FQDN entered, then a warning will appear, but you can ignore it)
  • The mirror should then start, and within moments, the Status should be "synchronized: the databases are fully synchronized"
mirror_6a.jpg
So, you should now have a working mirror! Perform a manual failover to test it. Follow the instructions below in "Doing a manual failover".
Here's what a working mirror setup looks like on the Principal:
mirror_8.jpg And, here's what it looks like on the Mirror:
mirror_9a.jpg

Doing a Manual Failover

If you need to take a box down for maintenance, then you can perform a manual failover. There are two methods - using the SQL Enterprise Manager, and using T-SQL. I'll explain both here, but you can choose depending on your situation.

Using the SQL Enterprise Manager

On the Principal server, right-click on the database and choose Mirror. Then, you'll see a Failover button. Click this, and you'll get a message about the failover swapping the roles. Click Yes, and within about 10 seconds, the roles will be swapped. If you do a refresh of the databases on both servers, you'll see the Principal is now marked as Restoring... and the old mirror has become the new Principal.

Using T-SQL

Here is the T-SQL to do the same as above. You can ignore the SET SAFETY lines if your mirror is using Synchronous mode. You can check the mode being used in the Mirror Properties (right-click Database, Mirror).
--Run on principal
USE master
GO

ALTER DATABASE dbName SET SAFETY FULL
GO
ALTER DATABASE dbName SET PARTNER FAILOVER
GO
--Run on new principal
USE master
GO

ALTER DATABASE dbName SET SAFETY OFF
GO

Doing a Forced Fail over

If your Principal goes Boom! and you have an unexpected outage, then you'll need to do a forced failover. This means the Mirror server is forced to become the Principal. There is a slight risk of data loss when this takes place, but if the Principal server is down, then what choice have you got? Obviously, you only want to do this forced failover when the principal is unexpectedly unavailable. In all other situations, you should do a normal manual failover.

Doing a Forced Failover using T-SQL

--Run on mirror if principal isn't available
USE
master
GO

ALTER DATABASE dbName SET PARTNER FORCE_SERVICE_ALLOW_DATA_LOSS
GO
For example, in a production environment, you'll have a monitoring system which checks for the availability of the Principal at regular intervals. If it detects that the database is unavailable, then it could run a VBScript or a USQL command line to execute this T-SQL on the mirror database. If you have a witness server, then this will be done automatically.

Step 5 - Configuring the ASP.NET Application to Use the Mirrored Database

The final step is to configure your ASP.NET application to use the mirrored ASPState SQL Server database (or your database). If you are using .NET 2.0 or higher, use the following steps:
  • In the web.config file, change any existing <sessionState key to the following (or if it doesn't exist, add it):

    <sessionState mode="SQLServer" allowCustomSqlDatabase="true"
       sqlConnectionString="data source=[PRINCIPALSERVER];
       failover partner=[MIRRORSERVER];initial catalog=ASPState;user id=[DBUSER];
       password=[DBPWD];network=dbmssocn;" cookieless="false" timeout="180" />
  • data source = [PRINCIPALSERVER] - For data source, add the IP address or name of the Principal server. This is a required parameter.
  • failover partner = [MIRRORPARTNER] - Specify the name of the Mirror server. This is a required parameter.
  • initial catalog = ASPState - or specify the name of your database if doing a custom database. This is a required parameter.
  • allowCustomSqlDatabase = "true" - This is a required parameter.
By configuring your application to use these settings, when the application makes a request to the database and the Principal server is not available, .NET will automatically send the request to the mirrored server. This should happen transparently so your website user should not notice any outage.
If you're using .NET 1.1, this Failover Partner is not present, so you'll need to roll your own code to transfer the client. This could be a simple try...catch around the database connection, and in the catch, it retries using the mirrored server.
In a unexpected outage scenario, the following happens:
  • The Principal server goes down.
  • The Witness server or your monitoring service detects the Principal database in unavailable.
  • The Witness server or your monitoring service forces the failover to your mirrored server, which becomes the new Principal.
  • ADO.NET detects that the principal server is down, and retries automatically with the mirrored server.
Important: If you have two or more web servers, you'll need to copy the above SessionState entry on to each of the web servers.
You'll also need to ensure you have the same validation key / decryption key on each of the web servers. If not, then the session data will not be able to be read if created on a different server. This is necessary if mirroring the ASPState database.
<machineKey
 validationKey="D581FCFD1xxxxxxxxxxxxxx16FEEBB4C56Axxxxxxxxxxxxxxxxxxxxxxxxxx"
 decryptionKey="55B44F83Cxxxxxxxxxxxxxxxxxxxxxxxxxxxxxxxxxxxxxxxxxxxxxxxxxxxxx"
 validation="SHA1" decryption="AES"
 />

Gotchas

You may get the following error messages and gotchas when playing with your mirror:
When attempting to do a FORCED FAILOVER with the SET PARTNER FORCE_SERVICE_ALLOW_DATA_LOSS TSQL, you get the following error:
"Cannot alter database <db>because the database is not in the correct state 
to become the principal" 
You'll be able to perform a manual failover fine, but forced failovers will cause the error. The mirror will NOT become the principal if it detects that the principal is already running. This may happen if you are testing a forced failover with code or a script and don't stop the SQL instance on the principal. If you stop the service on the principal, you can then perform a forced failover.
When setting up the mirror, you get the following error message when attempting to start the mirror:
"Remote copy of <db>has not been rolled forward to a point in time 
that is encompassed in the local copy of the database. Error: 1402" 
This will occur if you have not done a transaction log backup on the Principal and restored it (no recovery) on the Mirror. You MUST do this step, or this error will occur.

Mirroring a 2nd Database

If you want to mirror more than one database on the same servers, this is possible. You need to repeat Step 2 for the next database, and then Step 4 (just click Next, Next, Finish, etc). The databases will all use the same endpoint port.

Stopping the Mirror

If you want to stop and remove the mirror for a database, follow these steps:

On the Principal

  1. Right-click, Mirror > Remove Mirroring
  2. Refresh the database view (Principal should now show as normal database).
    The db is now a normal database.
  3. Delete the database

On the Mirror Itself

  1. Will currently be saying "Restoring..."
  2. Right, click and Delete the database or Take Offline and then delete.
    If the Delete is not showing, or you don't have control, Refresh the database view or reopen SQL Enterprise Mangler.
    Or to turn back to a normal database without deleting: Do another Restore Database but change the Options to be With Recovery (top option)

Conclusion

If you've been following the steps in this article, you should have now successfully setup the ASPState database as a mirrored database (or your own database), providing your web users with a decent amount of availability and protection against outage.
I hope the article has been of interest and of some help to someone. Any questions, drop a comment, and I'll try to answer it, or update the article if areas are not clear. Thanks for reading!

How to setup log shipping in sql server 2005 step by step

SQL Server 2005 SP2 was used to set up log shipping in this example.


   Step 1 - the servers that will be used in this example   
ls2005_01_a

   Step 2 - starting the log shipping setup   
ls2005_02_a

   Step 3 - starting the backup configuration   
ls2005_03_a
   Step 4 - entering the backup settings   
ls2005_04_a
   Step 5 - secondary server settings - database initialization   
ls2005_05_a
   Step 6 - secondary server settings - file copy settings   
ls2005_06_a
   Step 7 - secondary server settings - restore settings   
ls2005_07_a

   Step 8 - setting up the monitor server   
ls2005_08_a
   Step 9 - initilization tasks ran and jobs set up   
ls2005_09_a
   Step 10 - SUCCESS!   
ls2005_10_a


SQL Server 2005 - Merge Replication Step by Step Procedure

Introduction

Replication is a set of technologies for copying and distributing data and database objects from one database to another and then synchronizing between databases to maintain consistency. Using replication, you can distribute data to different locations and to remote or mobile users over local and wide area networks, dial-up connections, wireless connections, and the Internet.
Replication is the process of sharing data between databases in different locations. Using replication, we can create copies of a database and share the copy with different users so that they can make changes to their local copy of the database and later synchronize the changes to the source database.

Terminologies before getting started

Microsoft SQL Server 2000 supports the following types of replication:
  • Publisher is a server that makes the data available for subscription to other servers. In addition to that, publisher also identifies what data has changed at the subscriber during the synchronizing process. The publisher contains publication(s).
  • Subscriber is a server that receives and maintains the published data. Modifications to the data at the subscriber can be propagated back to the publisher.
  • Distributor is the server that manages the flow of data through the replication system. Two types of distributors are present, one is the remote distributor and the other the local distributor. The remote distributor is separate from the publisher and is configured as the distributor for replication. The local distributor is a server that is configured as the publisher and distributor.
  • Agents are the processes that are responsible for copying and distributing data between the publisher and subscriber. There are different types of agents supporting different types of replication.
  • Snapshot Agent is an executable file that prepares snapshot files containing schema and data of published tables and database objects, stores the files in the snapshot folder, and records synchronization jobs in the distribution database.
  • An article can be any database object, like Tables (Column filtered or Row filtered), Views, Indexed Views, Stored Procedures, and User Defined Functions.
  • Publication is a collection of articles.
  • Subscription is a request for a copy of data or database objects to be replicated.
img01.png

Replication types

Microsoft SQL Server 2005 supports the following types of replication:
  • Snapshot replication
  • Transactional replication
  • Merge replication
Snapshot replication
  • Snapshot replication is also known as static replication. Snapshot replication copies and distributes data and database objects exactly as they appear at the current moment in time.
  • Subscribers are updated with the complete modified data and not by individual transactions, and are not continuous in nature.
  • This type is mostly used when the amount of data to be replicated is small and data/DB objects are static or does not change frequently.
Transactional replication
  • Transactional replication is also known as dynamic replication. In transactional replication, modifications to the publication at the publisher are propagated to the subscriber incrementally.
  • Publisher and the subscriber are always in synchronization and should always be connected.
  • This type is mostly used when subscribers always need the latest data for processing.
Merge replication
It allows making autonomous changes to replicated data on the Publisher and on the Subscriber. With merge replication, SQL Server captures all incremental data changes in the source and in the target databases, and reconciles conflicts according to rules you configure or using a custom resolver you create. Merge replication is best used when you want to support autonomous changes on the replicated data on the Publisher and on the Subscriber.
Replication agents involved in merge replication are snapshot agent and merge agent.
Implement merge replication if changes are made constantly at the publisher and subscribing servers, and must be merged in the end.
By default, the publisher wins all conflicts that it has with subscribers because it has the highest priority. The conflict resolver can be customized.

Before starting the replication process

Assume that we have two servers:
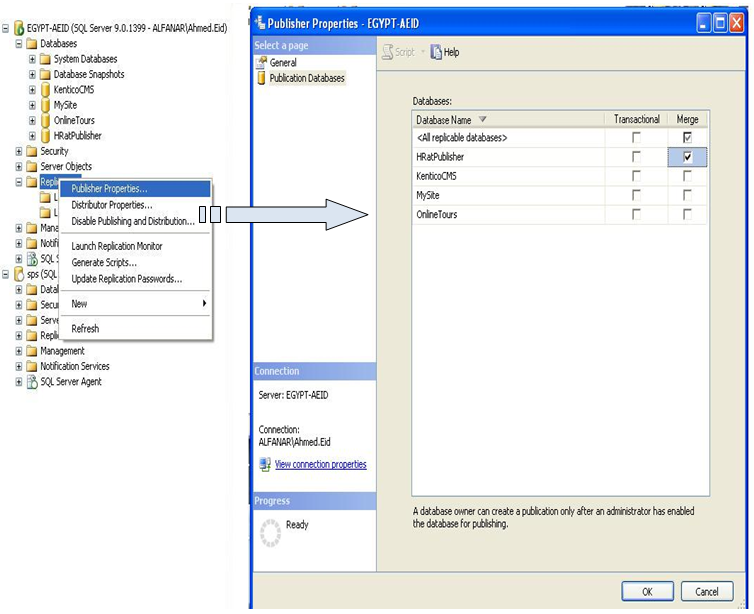
  • EGYPT-AEID: is the publisher server (contains HRatPublisher)
  • SPS: is the subscriber server (contains HRatSubscriber) use SQL Server Authentication mode for login
On the publisher database, I created a table Employees with the fields ID, Name, Salary, to replicate its data to the subscriber server. I will use the publisher as the subscriber also.
Note: Check that SQL Server Agent is running on the publisher and the subscriber.

Steps

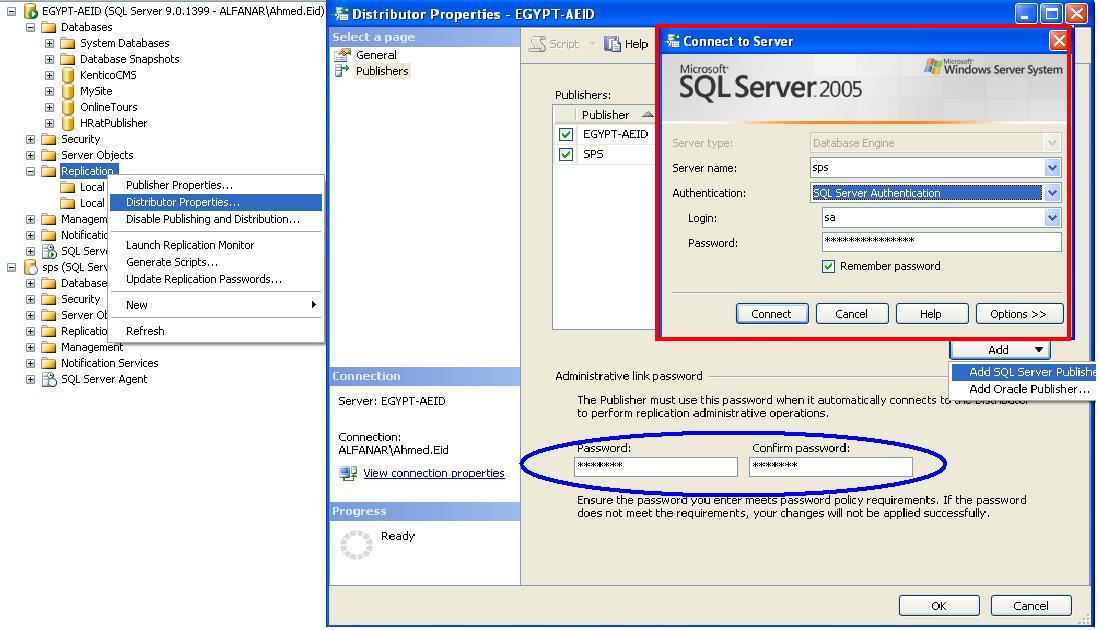
  1. Open SQL Server Management Studio and login with SQL Server Authentication to configure Publishing, Subscribers, and Distribution.
  2. img02.png
    1. Configure the appropriate server as the publisher or distributor.
    2. Enable the appropriate database for merge replication.
  3. Create a new local publication from DB-Server --> Replication --> Local Publications --> Right click --> New Pub.
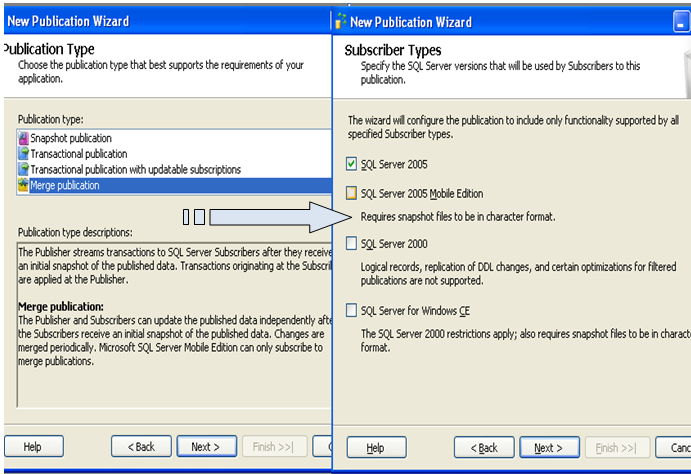
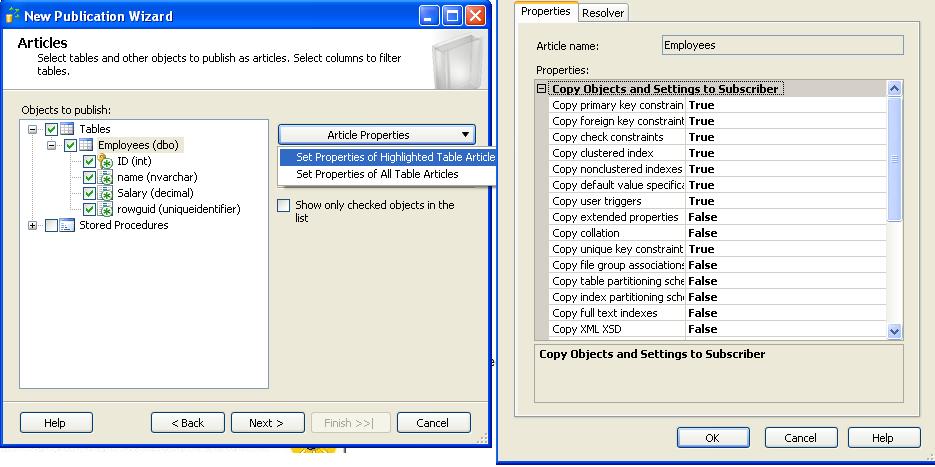
  4. Then choose the database that contains the data or objects you want to replicate. img06.png Choose the replication type and then specify the SQL Server versions that will be used by subscribers to that publication, like SQL Server 2005, SQL Mobile Edition, SQL for WinCE, etc. After that, manage the replication articles, data, and database objects by choosing the objects to be replicated. Note: you can manage the replication properties for the selected objects. Then add filters to the published tables to optimize performance and then configure the snapshot agent. img09.JPG img10.png and configure the security for the snapshot agent. Finally, rename the publication and click Finish. img12.png
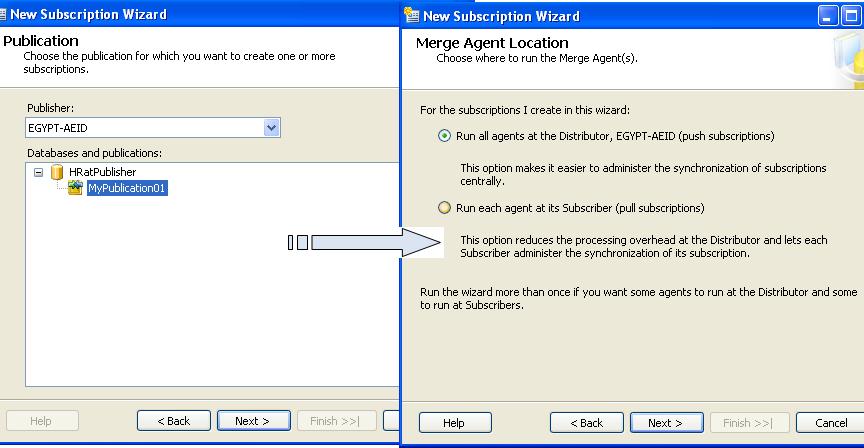
  5. Create a new subscription for the created "MyPublication01" publication by right clicking on MyPublication01 --> New Subscription.
  6. Configure the "Merge Agent" for the replication on the subscriber database. Choose one or more subscriber databases. You can add new SQL Server subscribers. img15.png Then specify the Merge Agent security as mentioned above on "Agent Snapshot". And specify the synchronization schedule for each agent.
Schedules:
  • Run continuously: add schedule times to be auto run continuously
  • Run on demand only: manually run the synchronization
img16.png
and then next up to the final step, and click Finish.
You can check errors from the "Replication Monitor" by right clicking on Local Replication --> Launch Replication Monitor.
Advantages of Replication
Users can avail the following advantages by using a replication process:
  • Users working in different geographic locations can work with their local copy of data, thus allowing greater autonomy.
  • Database replication can also supplement your disaster-recovery plans by duplicating the data from a local database server to a remote database server. If the primary server fails, your applications can switch to the replicated copy of the data and continue operations.
  • You can automatically back up a database by keeping a replica on a different computer. Unlike traditional backup methods that prevent users from getting access to a database during backup, replication allows you to continue making changes online.
  • You can replicate a database on additional network servers and reassign users to balance the loads across those servers. You can also give users who need constant access to a database their own replica, thereby reducing the total network traffic.
  • Database-replication logs the selected database transactions to a set of internal replication-management tables, which can then be synchronized to the source database. Database replication is different from file replication, which essentially copies files.
Replication performance tuning tips
  • By distributing partitions of data to different subscribers.
  • When running SQL Server replication on a dedicated server, consider setting the minimum memory amount for SQL Server to use from the default value of 0 to a value closer to what SQL Server normally uses.
  • Don’t publish more data than you need. Try to use row filter and column filter options wherever possible as explained above.
  • Avoid creating triggers on tables that contain subscribed data.
  • Applications that are updated frequently are not good candidates for database replication.
  • For best performance, avoid replicating columns in your publications that include TEXT, NTEXT, or IMAGE data types.
Thanks to "D J Nagendra", I used his article about SQL Server 2000 replication from CodeProject.com view to build the SQL Server 2005 replication version.

Twitter Delicious Facebook Digg Stumbleupon Favorites More

 
Design by Free WordPress Themes | Bloggerized by Lasantha - Premium Blogger Themes | Hosted Desktops