Showing posts with label LinuxServer. Show all posts

Thursday, July 7, 2011

Howto Red hat enterprise Linux 5 configure the network card

A. Red hat Linux provides following tools to make changes to Network configuration such as add new card, assign IP address, change DNS server etc.
[a] GUI tool (X Windows required) - system-config-network
[b] Command line text based GUI tool (No X Windows required) - system-config-network
[c] Edit configuration files stored in /etc/sysconfig/network-scripts/ directory.
Following instructions are compatible with
(1) Cent OS Linux
(2) Fedora Core Linux
(3) Red Hat Enterprise Linux (RHEL) 3/4/5
Note: If you are using Debian or Ubuntu Linux, please see this configuration howto.

Method # 1: GUI tool system-config-network

Type the following command at shell prompt (open x terminal):
$ system-config-network &
Red hat enterprise Linux 5 configure the network card - system-config-network
You will see Window as above. Now select your Ethernet card (eth0 or eth1) and click on Editbutton. You can now setup IP address, netmask, default gateway and other properties.
setup IP address, netmask, default gateway and other properties
You can obtain IP address using DHCP or setup manually. Once IP address assigned, click onOk button to save the changes. You can activate card by clicking on Activate button.

Method # 2: Command line tool system-config-network-tui

If you don’t have X windows GUI installed type the following command at shell prompt:
# system-config-network-tui &
Command line tool system-config-network-tui
(click to enlarge image)
You will see text based GUI as above. Select your Ethernet card (eth0 or eth1) and hit [Enter] or [F12] special key.
Cent OS, Fedora Core, RHEL configure the network card - system-config-network-tui
(click to enlarge image)
You can obtain IP address using DHCP or setup manually. Once IP address assigned, click onOk button to save the changes

Method #3: Edit configuration files stored in /etc/sysconfig/network-scripts/

You can configure network card by editing text files stored in /etc/sysconfig/network-scripts/directory. First change directory to /etc/sysconfig/network-scripts/:
# cd /etc/sysconfig/network-scripts/
You need to edit / create files as follows:
  • /etc/sysconfig/network-scripts/ifcfg-eth0 : First Ethernet card configuration file
  • /etc/sysconfig/network-scripts/ifcfg-eth1 : Second Ethernet card configuration file
To edit/create first NIC file, type command:
# vi ifcfg-eth0
Append/modify as follows:

# Intel Corporation 82573E Gigabit Ethernet Controller (Copper)
DEVICE=eth0
BOOTPROTO=static
DHCPCLASS=
HWADDR=00:30:48:56:A6:2E
IPADDR=10.10.29.66
NETMASK=255.255.255.192
ONBOOT=yes
Save and close the file. Define default gateway (router IP) and hostname in /etc/sysconfig//network file:
# vi /etc/sysconfig/network
Append/modify configuration as follows:
NETWORKING=yes
HOSTNAME=www1.nixcraft.in
GATEWAY=10.10.29.65
Save and close the file. Restart networking:
# /etc/init.d/network restart
Make sure you have correct DNS server defined in /etc/resolv.conf file:
# vi /etc/resolv.conf
Setup DNS Server as follows:
nameserver 10.0.80.11
nameserver 10.0.80.12
nameserver 202.67.222.222
Save and close the file. Now you can ping the gateway/other hosts:
$ ping 10.0.80.12
Output:

PING 10.0.80.12 (10.0.80.12) 56(84) bytes of data.
64 bytes from 10.0.80.12: icmp_seq=1 ttl=251 time=0.972 ms
64 bytes from 10.0.80.12: icmp_seq=2 ttl=251 time=1.11 ms

You can also check for Internet connectivity with nslookup or host command:
$ nslookup cyberciti.biz
Output:

Server:         10.0.80.11
Address:        10.0.80.11#53

Non-authoritative answer:
Name:   cyberciti.biz
Address: 75.126.43.232

You can also use host command:
$ host nixcraft.in
Output:

nixcraft.in has address 75.126.43.232
nixcraft.in mail is handled by 10 mail.nixcraft.in.

Wednesday, July 6, 2011

DHCP Server Configuration for Linux

Instructions


  1. Download dhcp rpm package from Red Hat and install:
    # rpm -ivh dhcp-2.0pl5-8.i386.rpm
  2. Open file /etc/sysconfig/dhcpd and edit the first line as follows:
    DHCPDARGS=eth1
    Replace 'eth1' above with the network interface that you want to use for dhcp; this should be an internal network interface; denial of service attacks are possible if dhcp is running on an external interface.
  3. Copy /usr/share/doc/dhcp-2.0pl5/dhcpd.conf.sample to /etc
    # cp /usr/share/doc/dhcp-2.0pl5/dhcpd.conf.sample /etc/dhcpd.conf
    This sample file is a good starting point for our /etc/dhcpd.conf file, which by default is not installed. Alternatively, copy the file from a working server.

  4. Edit /etc/dhcpd.conf to suit your needs. An example file is included below for reference:
    #################file begin######################
    subnet 10.0.0.0 netmask 255.255.255.0 {
    # --- default gateway
            option routers                  10.0.0.1;
            option subnet-mask              255.255.255.0;
    
    #       option nis-domain               "mydomain.com";
            option domain-name              "mydomain.com";
            option domain-name-servers      216.227.56.120, 64.34.4.36;
    
            option time-offset              -28800; # Pacific Standard Time
    #       option ntp-servers              192.168.1.1;
    #       option netbios-name-servers     192.168.1.1;
    # --- Selects point-to-point node (default is hybrid). Don't change this unless
    # -- you understand Netbios very well
    #       option netbios-node-type 2;
    
            range 10.0.0.50 10.0.0.254;
            default-lease-time 604800;
            max-lease-time 604800;
    
            host test {
    #               option dhcp-client-identifier   "test";
                    hardware ethernet 00:e0:18:90:28:b2;
                    fixed-address   10.0.0.10;
            }
            # we want the nameserver to appear at a fixed address
    #       host ns {
    #               next-server marvin.redhat.com;
    #               hardware ethernet 12:34:56:78:AB:CD;
    #               fixed-address 207.175.42.254;
    #       }
    }
    ########################file end##########################
    Notes: specific settings always override global settings; in the above, the range 10.0.0.50 to 10.0.0.254 have been set side for dynamic hosts; this allows anything between 10.0.0.1 and 10.0.0.49 to be set aside as static ips. In the example, host 'test' is given a static ip using its mac address. The option 'dhcp-client-identifier' may work as an alternative to mac address, but may require some additional configuration on the client. The max lease time of 604800 translates to 7 days. Lease times are automatically renewed by clients once 50% of the expiration date is reached. Because of this, very long lease times should be unnecessary. If a very long one is required, provide the client a static ip using the host declaration. Also, the option time-offset setting is in seconds according to the manual page; Red Hat's configuration document erroneously lists this setting in hours. Use option host-name "apex.example.com" in a host declaration to provide hostnames to clients.
  5. Check that the lease database has been created; the rpm should create this file automatically; if not, create the file:
    # touch /var/lib/dhcp/dhcpd.leases
    The lease database is recreated from time to time so that it is not too large. First, all known leases are saved in a temporary lease database. The dhcpd.leases file is renamed dhcpd.leases~, and the temporary lease database is written to dhcpd.leases.

    The DHCP daemon could be killed or the system could crash after the lease database has been renamed to the backup file but before the new file has been written. If this happens, there is no dhcpd.leases file that is required to start the service. Do not create a new lease file if this occurs. If you do, all the old leases will be lost and cause many problems. The correct solution is to rename the dhcpd.leases~ backup file to dhcpd.leases and then start the daemon.

  6. Run 'setup' and check dhcpd to have it load at system boot
  7. Start/restart the server
    # service dhcpd start (restart)
    Changes to the file /etc/dhcpd.conf require the dhcp server to be restarted
  8. Test to make sure it works.

Red Hat 6 Installation Guide – RHEL 6 Install Screenshots

The Red Hat Enterprise Linux 6 Beta is available on the following architectures:

  • i386
  • AMD64/Intel64
  • System z
  • IBM Power (64-bit)
Download Red Hat 6 Beta DVD images here.

Some of the many improvements and new features that are included in Red Hat Enterprise Linux 6

  • Power management – tickless kernel and improvements through the application stack to reduce wakeups, power consumption measurement by Powertop, Power Management (ASPM, ALPM), and adaptive system tuning by Tuned, all enhance more efficient system power usage.
  • Next generation networking – comprehensive IPv6 support (NFS 4, CIFS, mobile support [RFC 3775], ISATAP support), FCoE, iSCSI, and a new and improved mac 802.11 wireless stack.
  • Scalable filesystems – ext4 file system provides support for larger file sizes and significantly reduces repair times over ext3. XFS® is a high-performance file system that supports extremely large files and is optimized for large data transfers.
  • Virtualization – KVM includes performance improvements and new features, sVirt protects the guest and host from unauthorized access, SR-IOV and NPIV deliver high-performance virtual use of physical devices, and libvirt leverages kernel resource management functionality.
  • Enterprise security enhancement – SELinux includes improved ease of use, application sandboxing, and significantly increased coverage of system services, while SSSD provides unified access to identity and authentication services as well as caching for off-line use.
  • Development and runtime support – SystemTap improvements, ABRT is a new framework for simple collection and reporting of bug information, and improvements are made to GCC (version 4.4.3), glibc (version 2.11.1), and GDB (version 7.0.1).
On this guide I use Graphical Installer. There is also Kickstart automated installation method and Text-based Installer available. And I install this machine for Software Development Workstation and testing environment. So package selection is following: Desktop, Web server, Databases, Compiling tools, Java. Same method works also for servers, normal desktops and other setups, but of course different software selection. So let’s begin installation…

Burn Downloaded Image to DVD and Boot Computer Using Red Hat 6 Installation DVD

Check RHEL image MD5 sum and burn image to DVD with your favourite CD/DVD burner. And boot computer using Red Hat Installation DVD.

Red Hat 6 RHEL Installation

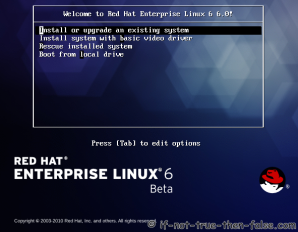
1. Select Install or upgrade an existing system option on Grub Menu

1. Select Install or upgrade an existing system option on Grub Menu

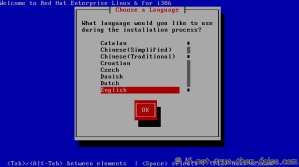
2. Choose a language

2. Choose a language

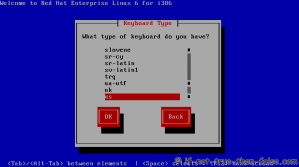
3. Choose a keyboard type

3. Choose a keyboard type

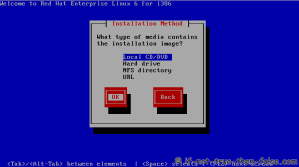
4. Choose a installation media

4. Choose a installation media

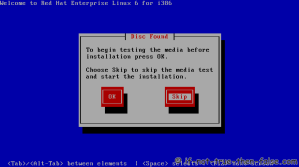
5. Skip DVD media test (or select media test, if you want to test installation media before installation)

5. Skip DVD media test (or select media test, if you want to test installation media before installation)

6. Red Hat 6 graphical installer starts, select next

6. Red Hat 6 graphical installer starts, select next

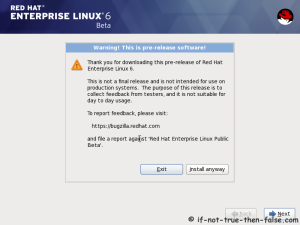
7. Accepct Pre-Release Installation

7. Accepct Pre-Release Installation

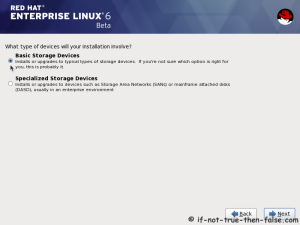
8. Select storage devices

8. Select storage devices

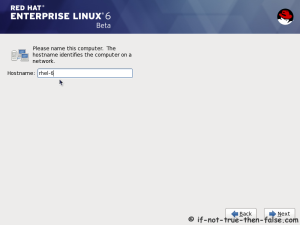
9. Insert computer name

9. Insert computer name

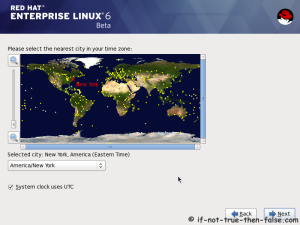
10. Select time zone

10. Select time zone

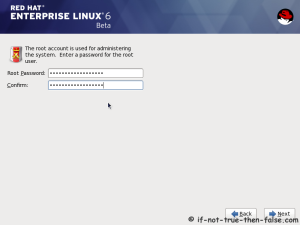
11. Enter a password for root user

11. Enter a password for root user

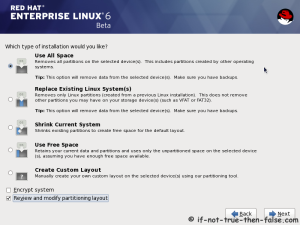
12. Select type of installation

Read every options info carefully. And select encrypting if needed and option to review and modify partition layout.
12. Select type of installation

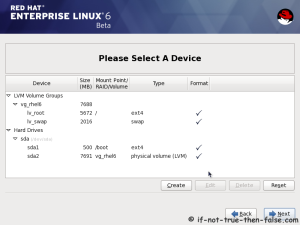
13. Review partition layout

Modify if needed. Default setup with ext4 and LVM looks good for desktop machine.
13. Review partition layout and modify if needed

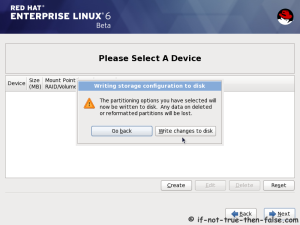
14. Accept write changes to disc

14. Accept write changes to disc

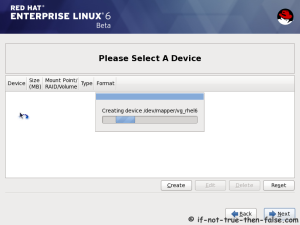
15. Writing changes (creating partitions) to disc

15. Writing changes (creating partitions) to disc

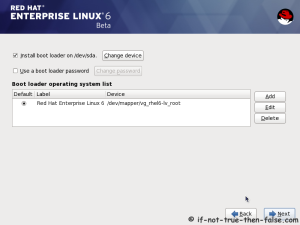
16. Configure boot loader options

Select device to install bootloader and check/create boot loader operating system list.
16. Configure boot loader options

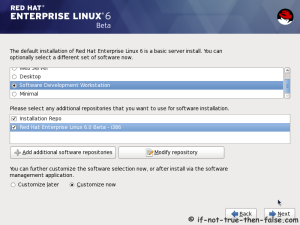
17. Select softwares to install and enable repositories

This case we select Software Development Workstation and enable Red Hat Enterprise Linux 6.0 Beta Repository and select Customize now.
17. Select softwares to install and enable repositories

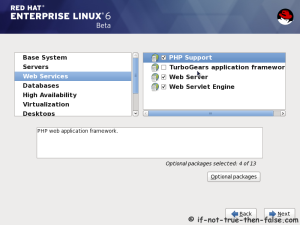
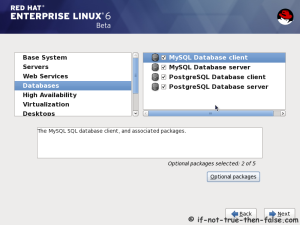
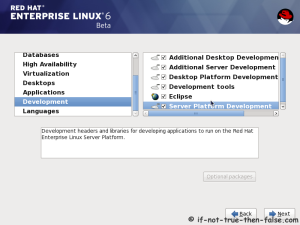
18. Customize package selection

Select PHP and Web Server to installation.
18. Customize package selection - Select PHP and Web Server to installation
Select MySQL and PostgreSQL Databases.
18. Customize package selection - Select MySQL and PostgreSQL Databases
Select set of Development tools like Eclipse IDE.
18. Customize package selection - Select set of Development tools like Eclipse IDE

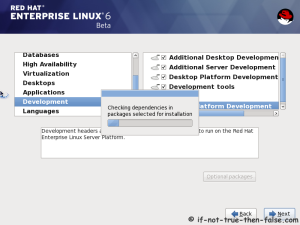
19. Checking dependencies for installation

19. Checking dependencies for installation

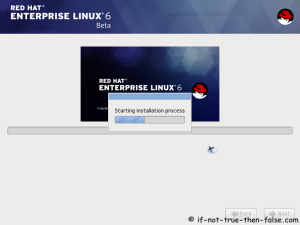
20. Starting installation process

20. Starting installation process

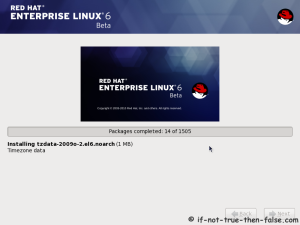
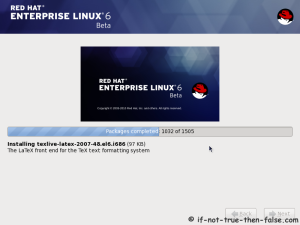
21. Installing packages

21. Installing packages 1
21. Installing packages 2

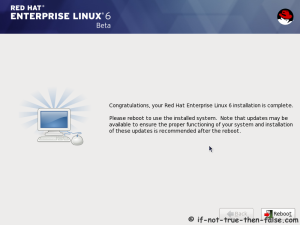
22. Installation is complete

Click reboot computer and remove installation media.
22. Installation is complete - Click reboot computer and remove installation media

Red Hat 6 RHEL Finishing Installation

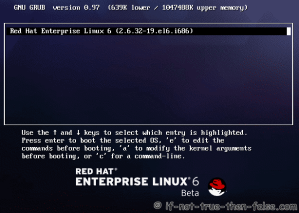
23. Selecting RHEL 6 from grub

23. Selecting RHEL 6 from grub

24. Booting Red Hat 6

24. Booting Red Hat 6

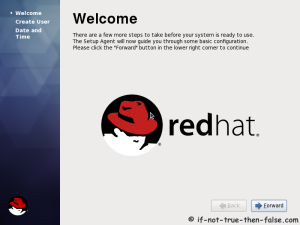
25. Red Hat 6 Welcome screen

25. Red Hat 6 Welcome screen

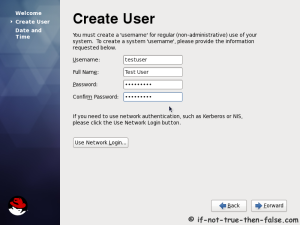
26. Create normal user

26. Create normal user

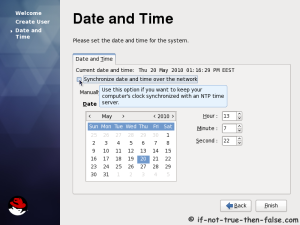
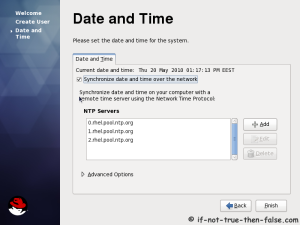
27. Setup date and time and keep up-to-date with NTP

27. Setup date and time
27. Setup date and time and keep up-to-date with NTP

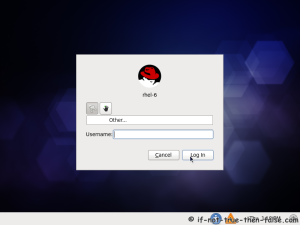
28. Login Red Hat 6 Gnome Desktop

28. Login Red Hat 6 Gnome Desktop

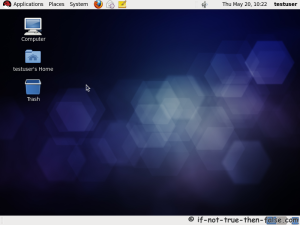
29. Red Hat (RHEL) 6 Gnome Desktop, empty and default look

29. Red Hat (RHEL) 6 Gnome Desktop, empty and default look

Tuesday, July 5, 2011

Linux Command: To check the port speed on the ethernet card.

ethtool eth0 - Will check the port speed on the ethernet card.

[root@admin.local ~]# ethtool eth0
Settings for eth0:
Supported ports: [ TP MII ]
Supported link modes: 10baseT/Half 10baseT/Full
100baseT/Half 100baseT/Full
Supports auto-negotiation: Yes
Advertised link modes: 10baseT/Half 10baseT/Full
100baseT/Half 100baseT/Full
Advertised auto-negotiation: Yes
Speed: 100Mb/s
Duplex: Full
Port: MII
PHYAD: 32
Transceiver: internal
Auto-negotiation: on
Supports Wake-on: pumbg
Wake-on: d
Current message level: 0×00000007 (7)
Link detected: yes

Install Ubuntu server

These are step by step Ubuntu server v8.04 installation guide. Press Tab key on the keyboard to move the cursor between menus. Press Enter key to proceed.

1) Select language

2) Press F1 for help - Press Esc to exit help

3) Enter to the next step - You'll see menu below(without description):
Install Ubuntu - proceed the installation.
Check CD defect - Do this if you don't want the installation failed in the middle of the process.
Rescue broken system - We don't have Ubuntu yet. Skip this.
Test memory - This is going to take some times (I mean it).
Boot from first hard disk - We don't have Ubuntu yet. Skip this.
4) Check CD defect if you haven't done it before. The system will reboot after finish the integrity test. You can test memory if you want. Press c for configuration menu. Press number to open menu. Press c again to go back to configuration menu. Press Esc to stop checking and reboot to start the installation again (from the memory test screen, not the configuration menu).

5) Choose the Install Ubuntu menu to proceed the Ubuntu server installation.

6) Choose language.

8) Detect keyboard layout - Choose yes and press one of the keys if it's in your keyboard.

9) The system will detect network hardware when you choose Configure the network menu.
Network auto configuration will look up for DHCP if available. If not, you can configure manually or just skip for now.

10) Enter the hostname for your system.

11) Configure the clock.

12) Partition disk.
If this system is all for Linux, choose Guided - use entire disk. If there's other operating system sharing the same hard disk, like a dual boot, or you have your own reason, choose the Manual partition method.
Select disk to partition.
Confirmation to write partition to hard disk. Proceed only if you really sure what you are doing because after this all the data on the hard disk will be gone.
13) Installing the base system.

14) Setup users and passwords:
Full name for the new user.
Username for your account.
Password for the new account
Confirm password for the new account.
15) Software selection - Use spacebar to select. Select all if this is a testing or for learning server. Otherwise, you know what you need.

16) Set Mysql server password. This password is for Mysql root user.

17) Postfix configuration. Choose mail configuration type. If this is a testing server, choose local or just leave it alone by choosing No configuration.

18) Finish the installation.

19) System reboot.

20) Login.

How to add user to a group in Linux operating system

We can assign user to a group during adding a new user account. But how do we add existing user to a group? This tutorial is a guide on how to add user to a new group. The right Linux command for the job is the usermod command.

This is some information about Linux usermod command from manual page:

NAME
usermod - modify a user account

SYNOPSIS
usermod [options] LOGIN

DESCRIPTION
The usermod command modifies the system account files to reflect the
changes that are specified on the command line.


As you can see, the Linux usermod command can be used to modify a user account. However in this tutorial, we'll only use usermod command to add user to a new group. For this example, we'll create a new group to practice. Use the groupadd command to create a new group:

luzar@ubuntu:~$ groupadd programmer
groupadd: unable to lock group file
luzar@ubuntu:~$ sudo groupadd programmer
[sudo] password for luzar:
luzar@ubuntu:~$

Don't forget to use sudo command in Ubuntu, else you'll get the groupadd: unable to lock group file error as in the example above. Check whether the programmer group has been created in /etc/group file:

luzar@ubuntu:~$ less /etc/group | grep programmer
programmer:x:1001:
luzar@ubuntu:~$

Next, we are going to add user to a new group. For this example, we are going to add a user called luzar to the programmer group. Below are step by step instructions.

Use usermod -G option to add user to a new group:

luzar@ubuntu:~# sudo usermod -G programmer luzar

Use Linux groups command to check whether the programmer group has been added to luzar's group:

luzar@ubuntu:~# groups luzar
luzar : users programmer
luzar@ubuntu:~#

As you can see, the user luzar now has programmer as a second group. We can also check /etc/group to verify user currently in the programmer group:

luzar@ubuntu:~$ less /etc/group | grep programmer
programmer:x:1001:luzar
luzar@ubuntu:~$

That's all.

Mount external hard drive in Ubuntu server

Insert external hard drive usb connector into the Ubuntu server usb port. Ubuntu server automatically detect the external hard drive as a usb device. Below is the example screenshot when ubuntu detected the external hard drive:


We can see that the external hard drive has been detected as sdb. That is the name of the external hard drive to use when we are going to mount the device. We can check the device in /proc/scsi/scsi file. To do that, issue the command as in the example below:

luzar@ubuntu:~$ cat /proc/scsi/scsi
Attached devices:
Host: scsi1 Channel: 00 Id: 00 Lun: 00
Vendor: NECVMWar Model: VMware IDE CDR10 Rev: 1.00
Type: CD-ROM ANSI SCSI revision: 05
Host: scsi2 Channel: 00 Id: 00 Lun: 00
Vendor: VMware, Model: VMware Virtual S Rev: 1.0
Type: Direct-Access ANSI SCSI revision: 02
Host: scsi3 Channel: 00 Id: 00 Lun: 00
Vendor: Generic Model: USB Disk Rev: 9.02
Type: Direct-Access ANSI SCSI revision: 02
luzar@ubuntu:~$

Create a proper directory in Ubuntu server to mount the external hard drive. In this example, we create a directory named extdisk in /mnt directory:

luzar@ubuntu:~$ sudo mkdir /mnt/extdisk
[sudo] password for luzar:
luzar@ubuntu:~$ ls /mnt/
dvd extdisk usb win

Now we can mount the external hard drive with Linux mount command:

luzar@ubuntu:~$ sudo mount /dev/sdb /mnt/extdisk/
mount: you must specify the filesystem type

The external hard drive cannot be mounted. This happened when we mount a windows formatted external hard drive. We must specify the filesystem. Windows filesystem format is known as nsfs-3g in Linux. So we mount the external hard drive again with the complete command:

luzar@ubuntu:~$ sudo mount -t ntfs-3g /dev/sdb /mnt/extdisk/
NTFS signature is missing.
Failed to mount '/dev/sdb': Invalid argument
The device '/dev/sdb' doesn't have a valid NTFS.
Maybe you selected the wrong device? Or the whole disk instead of a
partition (e.g. /dev/hda, not /dev/hda1)? Or the other way around?

We still cannot mount the external hard drive. Again, we mount the external hard drive but this we change the device name from /dev/sdb to /dev/sdb1 as suggested by Ubuntu message above.

luzar@ubuntu:~$ sudo mount -t ntfs-3g /dev/sdb1 /mnt/extdisk/
luzar@ubuntu:~$ ls /mnt/extdisk/
ghost dell170l ghost mimos RECYCLER System Volume Information
luzar@ubuntu:~$

We successfully mounted the external hard drive this time. Now that the external drive has been mounted, we can use it as other directory in Ubuntu.

To unmount the external hard drive, we can use the Linux umount command like in the example below:

luzar@ubuntu:~$ sudo umount /mnt/extdisk/
[sudo] password for luzar:
luzar@ubuntu:~$

That's all.

Friday, May 27, 2011

Redhat linux commands

Here's a list of killer commands on a typical Linux installation. Keep in mind that there are some flavors of Linux that may not support the commands listed here.

chfn
Used to insert user information (also known as finger info) for a user account.
chkconfig
Display or change run level settings for all services listed in /etc/rc.d.
chcon
File security modifier to change file and directory CONTEXT permissions - NEW!.
chmod
File security modifier to change permissions.
chown
File security modifier to change owner.
cron
Scheduling Utility
df
Generates a report on the freespace for each partition.
diff
Compares and displays the DIFFerence between two files. Similar to the comp utility in Windows.
dig
DNS Name Resolution Utility
find
Helpful search tool
grep
Text filtering Utility.
init
Switched from one run level to another.
less
See - more
more
Utility used to display text output one screen at a time. Ex. more /etc/motd
rpm
RedHat Package Manager - This tool allows you to install software packages that are already compiled. This makes software installation easier and even faster. Unfortunately the latest version is not always available.
service
Used to start, stop, restart, or reload any installed service. EX. service sendmail stop
su
Used to get Super User rights (root) also great for logging in as another user if you append --login .
tar
Tape ARchive - File backup program. Use man tar to get more info.
top
Resource usage analyzer. Will Display RAM, CPU, and total time usage.
up2date
Used to update Linux Packages to plug securitye vulnerabilities.
useradd
Used to create a new user account.
userdel
Used to delete a user account.
vi
Very flexible but cryptic text editor.
wget
Web Get - This is a great utility to download any file available on the Internet.
yum
Similar functionality to RPM (see above) however will automatically resolve dependencies.

Thursday, May 26, 2011

free redhat 6 download

Twitter Delicious Facebook Digg Stumbleupon Favorites More

 
Design by Free WordPress Themes | Bloggerized by Lasantha - Premium Blogger Themes | Hosted Desktops